Light
I've been attending a lighting class at Tri-Community Photography School taught by Don Gale the past couple of months. I chose that class primarily because I wanted to catch up on one of the most important aspects of photography, light.
Just before I take you completely off track as usual, there are a couple of books that I found particularly helpful while we're on the subject of light.
Existing Light Techniques for Wedding and Portrait Photography by Bill Hurter. It's a relatively short book with some excellent images that would wow you normally, and he explains the technique used in there to make the image possible. Although he doesn't take you by your hand and teach you step by step, the author has done a good job explaining the approach and setup, and most importantly talking about how to use natural light and even mixing different lighting. There's also a good variety of techniques covered in the book which really makes it worthwhile.
The second one I recommend is The Complete Guide to Light and Lighting in Digital Photography by Michael Freeman. This is a great book if you're into photography but don't understand enough about light. Michael Freeman dissects light into many different categories and examines each of them individually. He also covers a great deal of lighting equipment from portable shoe-mount flash to heavy studio lighting. Towards the back of the book contains variations of some simple lighting setup which allows you to compare them side by side to see from the subtle differences to dramatic changes of results by simple adjustments to the lights.
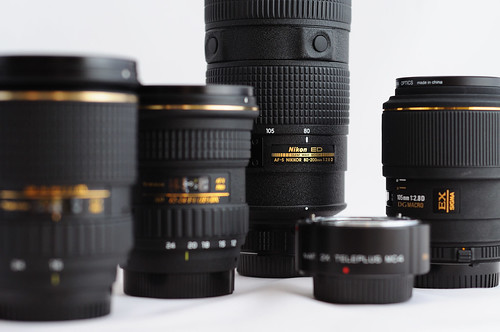
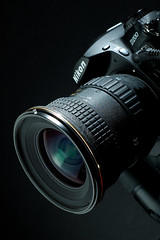
I was cleaning up my guest room the other day which houses my camera equipment and saw a stream of beautiful sunlight shining through the window. I wanted to play with the light a little and so I popped open my ebay light tent and put my lenses inside to see how it compares to using my usual flash setup.
Gosh, the light is so much softer and it's unbelievably easy to shoot 'cause the box pretty much is completely lit by natural light, and it's constant lighting that the camera can meter... Notice the shadow side of the lenses and even towards the bottom are also lit very well to show enough details. I also noticed the slightly pinkish tent looks almost perfectly white under natural light. I normally have to clean up the pinkish white background after I shoot with my flash.
That little experiment really got me thinking about learning how to better work with natural light instead of using my flash all the time. Comparing the quality of light, it's really hard to beat early morning window light if you're looking for diffused directional light. It's got a totally different quality to flash light, and it takes a totally different approach to harness. This is where a large white/gold/silver reflector or a diffusion panel would come in handy. It allows you to alter the direction of light, the color temperature of the light, and by varying the distance and angle, you can even change the intensiveness of the light. Not bad considering we're talking about 30 bucks off ebay, and the rest is free! (last time I checked the government has not began taxing us on sunlight yet)
")
Here, I took a few quick shots to show what a diffusion panel makes. This image above was taken in the morning in a small room. The only light source is the window light, and I placed the subject on a small table right next to the window. The direction of the window light is great, but still it is direct sunlight on a clear day and it looks harsh. Look closer at the shadows and examine the edge of it, and now compare the next image.
")
Big difference huh? Pay close attention to the shape of the shadow and see how much more diffused it looks. The light looks a lot softer, and you can hardly see the frame of the window anymore. The light source never changed, and the only difference here is a cheap white translucent diffusion panel placed over the window. The result is a much more pleasing image.
")
This would be extremely useful during a wedding shoot when you come across beautiful window light, but blinds are in place of sheer curtains. If I had a second set of hands or somebody helping me hold a second reflector panel to act as a fill light, the results would be much more pleasing instead of having the subject sitting right next to the window to let the sunlight cast shadows over the chin and nose bridge.
Too bad I can't exactly fit this huge panel into my camera bag... :) But then again, I'm sure this will open up entirely new opportunities in the quest to harness our free light source.
Next up, review on BlackRapid R-Strap.
Just before I take you completely off track as usual, there are a couple of books that I found particularly helpful while we're on the subject of light.
Existing Light Techniques for Wedding and Portrait Photography by Bill Hurter. It's a relatively short book with some excellent images that would wow you normally, and he explains the technique used in there to make the image possible. Although he doesn't take you by your hand and teach you step by step, the author has done a good job explaining the approach and setup, and most importantly talking about how to use natural light and even mixing different lighting. There's also a good variety of techniques covered in the book which really makes it worthwhile.
The second one I recommend is The Complete Guide to Light and Lighting in Digital Photography by Michael Freeman. This is a great book if you're into photography but don't understand enough about light. Michael Freeman dissects light into many different categories and examines each of them individually. He also covers a great deal of lighting equipment from portable shoe-mount flash to heavy studio lighting. Towards the back of the book contains variations of some simple lighting setup which allows you to compare them side by side to see from the subtle differences to dramatic changes of results by simple adjustments to the lights.
I was cleaning up my guest room the other day which houses my camera equipment and saw a stream of beautiful sunlight shining through the window. I wanted to play with the light a little and so I popped open my ebay light tent and put my lenses inside to see how it compares to using my usual flash setup.
Gosh, the light is so much softer and it's unbelievably easy to shoot 'cause the box pretty much is completely lit by natural light, and it's constant lighting that the camera can meter... Notice the shadow side of the lenses and even towards the bottom are also lit very well to show enough details. I also noticed the slightly pinkish tent looks almost perfectly white under natural light. I normally have to clean up the pinkish white background after I shoot with my flash.
That little experiment really got me thinking about learning how to better work with natural light instead of using my flash all the time. Comparing the quality of light, it's really hard to beat early morning window light if you're looking for diffused directional light. It's got a totally different quality to flash light, and it takes a totally different approach to harness. This is where a large white/gold/silver reflector or a diffusion panel would come in handy. It allows you to alter the direction of light, the color temperature of the light, and by varying the distance and angle, you can even change the intensiveness of the light. Not bad considering we're talking about 30 bucks off ebay, and the rest is free! (last time I checked the government has not began taxing us on sunlight yet)
Here, I took a few quick shots to show what a diffusion panel makes. This image above was taken in the morning in a small room. The only light source is the window light, and I placed the subject on a small table right next to the window. The direction of the window light is great, but still it is direct sunlight on a clear day and it looks harsh. Look closer at the shadows and examine the edge of it, and now compare the next image.
Big difference huh? Pay close attention to the shape of the shadow and see how much more diffused it looks. The light looks a lot softer, and you can hardly see the frame of the window anymore. The light source never changed, and the only difference here is a cheap white translucent diffusion panel placed over the window. The result is a much more pleasing image.
This would be extremely useful during a wedding shoot when you come across beautiful window light, but blinds are in place of sheer curtains. If I had a second set of hands or somebody helping me hold a second reflector panel to act as a fill light, the results would be much more pleasing instead of having the subject sitting right next to the window to let the sunlight cast shadows over the chin and nose bridge.
Too bad I can't exactly fit this huge panel into my camera bag... :) But then again, I'm sure this will open up entirely new opportunities in the quest to harness our free light source.
Next up, review on BlackRapid R-Strap.


